bread, food blogging, food photography, recipes, soup, thefoodygrail.com

Roasted Vegetable Soup with Savoury Croissants.

Vegetable soup.
Squash, sweet potato and roasted pepper soup served with savoury croissants. Finished with a warming chilli and garlic oil.

As the rustic shades of Autumn invade the last green remnants of summer, it’s time for a hearty and warming soup. Butternut squash, sweet potato and roasted red pepper make for a wonderful creamy soup. Served with a chilli- garlic oil and accompanied with  savoury croissants flavoured with anchovies and sun dried tomato.

Ingredients:

Soup:
1 butternut squash – peeled, halved, seeds removed and chopped into large chunks.
Note: Use other varieties of squash if you so wish – equivalent to one butternut variety.
1 sweet potato – peeled and cut into wedges.
1 large red onion – peeled, halved and cut into wedges.
2 roasted red peppers – skins removed.
2 sticks of celery.
1 dessert spoon of dried marjoram.
3 cloves of garlic
1 tabls red wine vinegar.
40g butter.
1.2 litres chicken stock or veg stock if you prefer.
10 sprigs or 3g of fresh parsley.
Drizzle of olive oil.
Seasoning – salt and pepper.

Garnish:
100ml chilli oil infused with 1 crushed clove of garlic.
5g chopped fresh basil.
Optional: 50g of grated Parmesan cheese.

Savoury Croissants:
227g strong bread flour.
23g unsalted butter.
1/4 tsp of salt.
10g or 3 tsps of easy bake yeast.
125ml warm milk.
1/2 a beaten egg – approx’ 27g
20g chopped anchovies.
30g sun dried tomatoes – chopped.
90g chilled butter – cut into small dice.

Method/cook:

Soup:
Set oven to gas 6 or 200°C / 400°F
Place your chopped squash in a roasting tray – drizzle with olive oil. Season with salt, pepper and marjoram. (see image)
_V2A9679
Now place your sweet potato wedges and onion wedges into a roasting tray – drizzle with olive oil. Season with salt, pepper and marjoram.
Roast your squash, sweet potato and onion for 45 mins’ until lightly charred and soft.
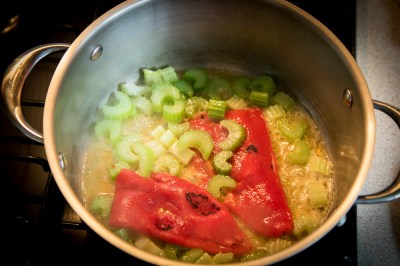
In a large pan melt the butter. Add the chopped celery, roasted pepper and garlic – sweat until celery is softened. (see image)
_V2A9686
When celery is soft add the vinegar and reduce. Set aside.
Once the roasted veg’ are cooked add them to the softened celery and pepper. With the pan on a medium heat, further brown the veg’ by cooking for 10 mins’. (see image)
_V2A9690
Add the stock and parsley to the veg’ and simmer for 20 mins.
Once simmered, blend all the veg’ to a creamy soup. Season with salt and pepper. Set aside.

Savoury Croissants:
Rub the 23g of butter into the flour. Mix in the easy bake yeast and salt.
Add the warm milk and form into a dough.
Turn the dough out onto a lightly floured surface and knead for ten minutes.
Once kneaded, place in a floured bowl and cover with cling film or a damp cloth. Leave to proof until doubled in size.
Note: The dough can be chilled in the refrigerator after first proof then rolled and formed the next day.
Once proofed, knock back the dough and knead for 10 mins’.
Combine the chopped anchovies with the chopped sun dried tomato – set aside.
Now for the rolling and layering of the dough.
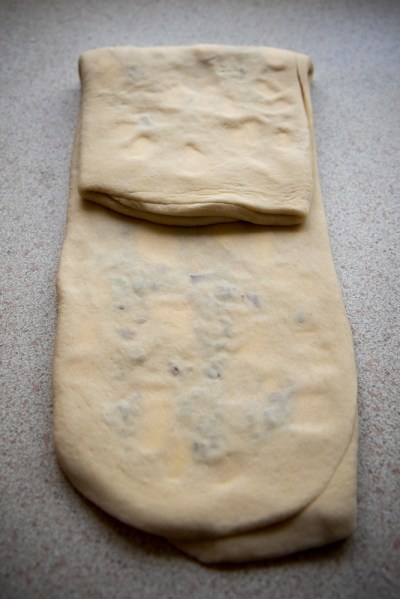
Roll the dough into a 36cm x 21cm oblong. (see image)
_V2A9692
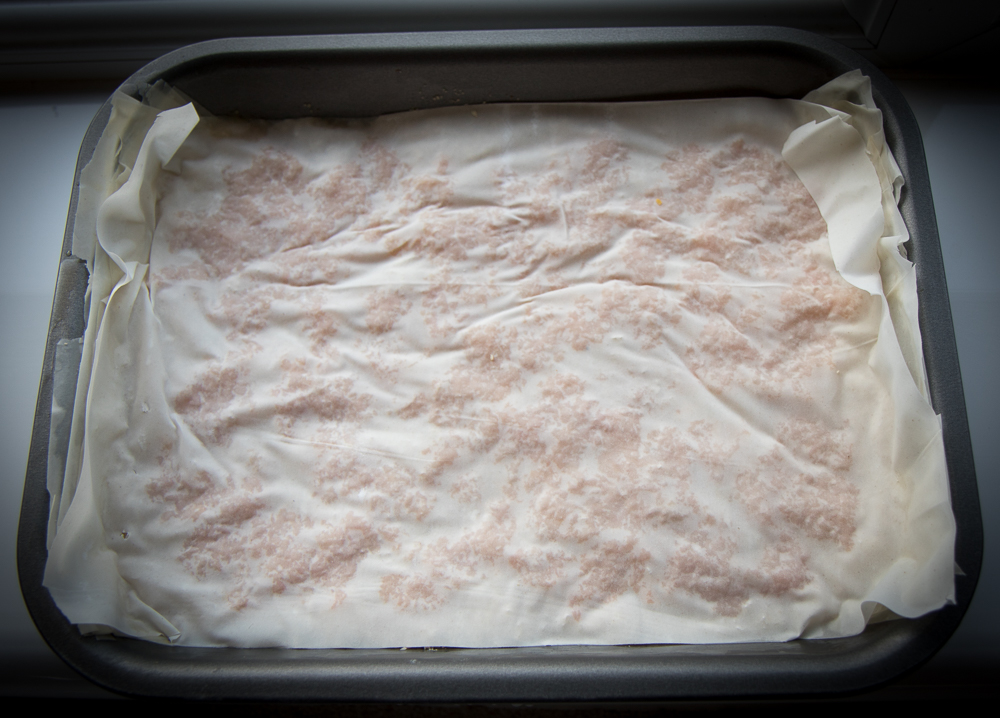
Place half the 90g of butter and half of the anchovy and tomato onto the middle third of the pastry. (see image)
_V2A9695
Fold the top third of pastry over the butter. (see image)
_V2A9697
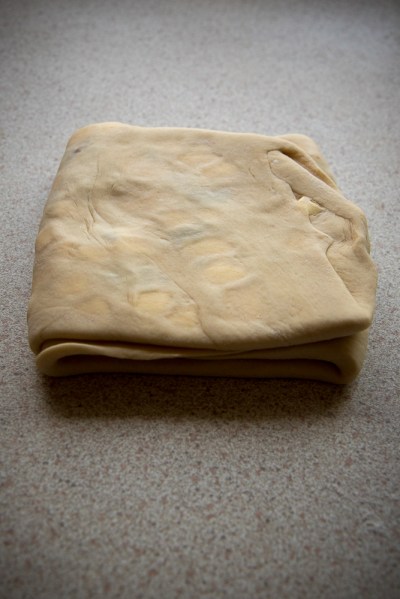
Place rest of butter and the rest of the anchovy and tomato mix onto the top third of the pastry. (see image)
_V2A9699
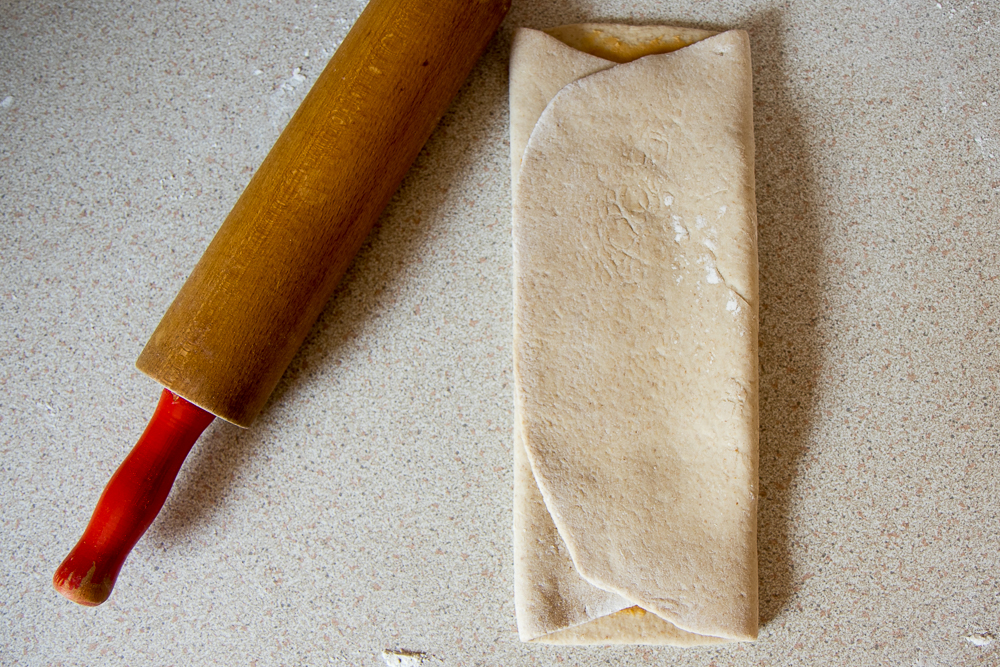
Fold up the bottom third of the pastry. (see image)
_V2A9701
Turn the pastry clockwise one turn. (see image)
_V2A9702
Roll out the pastry to a 46cm x 14cm oblong. (see image)
_V2A9704
Fold the top third of pastry over the middle third. (see image)
_V2A9706
Fold the bottom third up over the top third. (see image)
_V2A9708
Chill the pastry for 30 mins’ to firm up the butter.
Once chilled, turn the pastry clockwise one turn. (see image)
_V2A9710
Roll out the pastry again to a 46cm x 14cm oblong. (see image)
_V2A9704
Fold as previously explained and chill again for 30 mins’
For the final roll, turn the pastry one turn clockwise.
Roll out to a 56cm x 17cm oblong. (see image)
_V2A9713
Once rolled, cut 8 – 10 triangles with a sharp knife. (see image)
_V2A9714
Roll each triangle up from the widest end. (see image)
_V2A9717
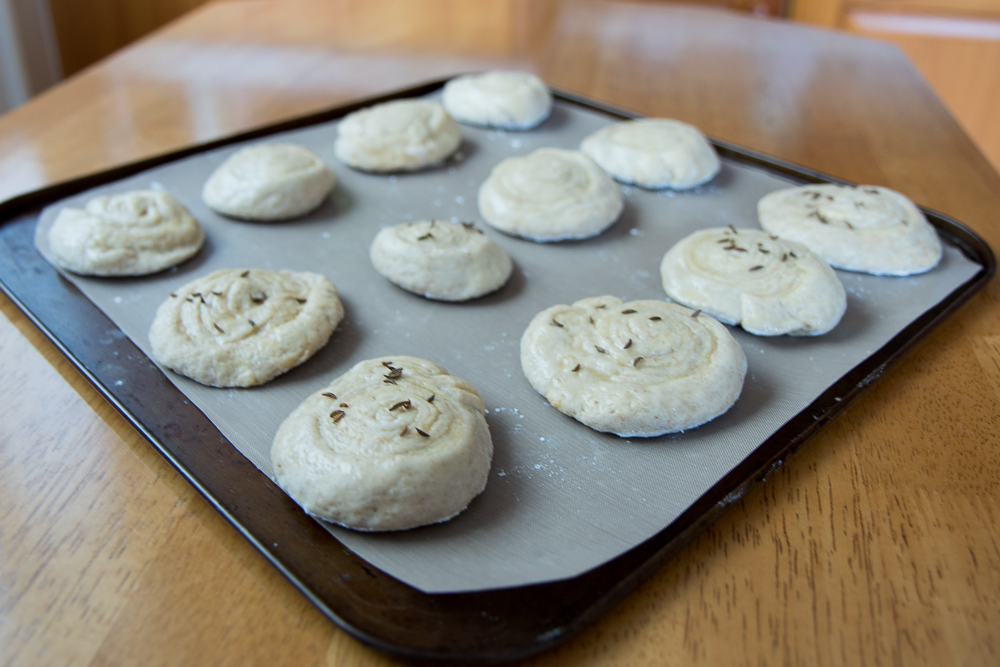
Place the rolled dough triangles on baking trays lined with parchment paper. Egg wash and leave to proof until doubled in size. (see image)
_V2A9718
Note: Make sure the points of the dough triangles are tucked underneath so that the croissants don’t unravel.
Set oven to gas 5 or 190°C / 375°F
Once proofed bake for 25 minutes until golden brown.
Cool on baking racks once baked.
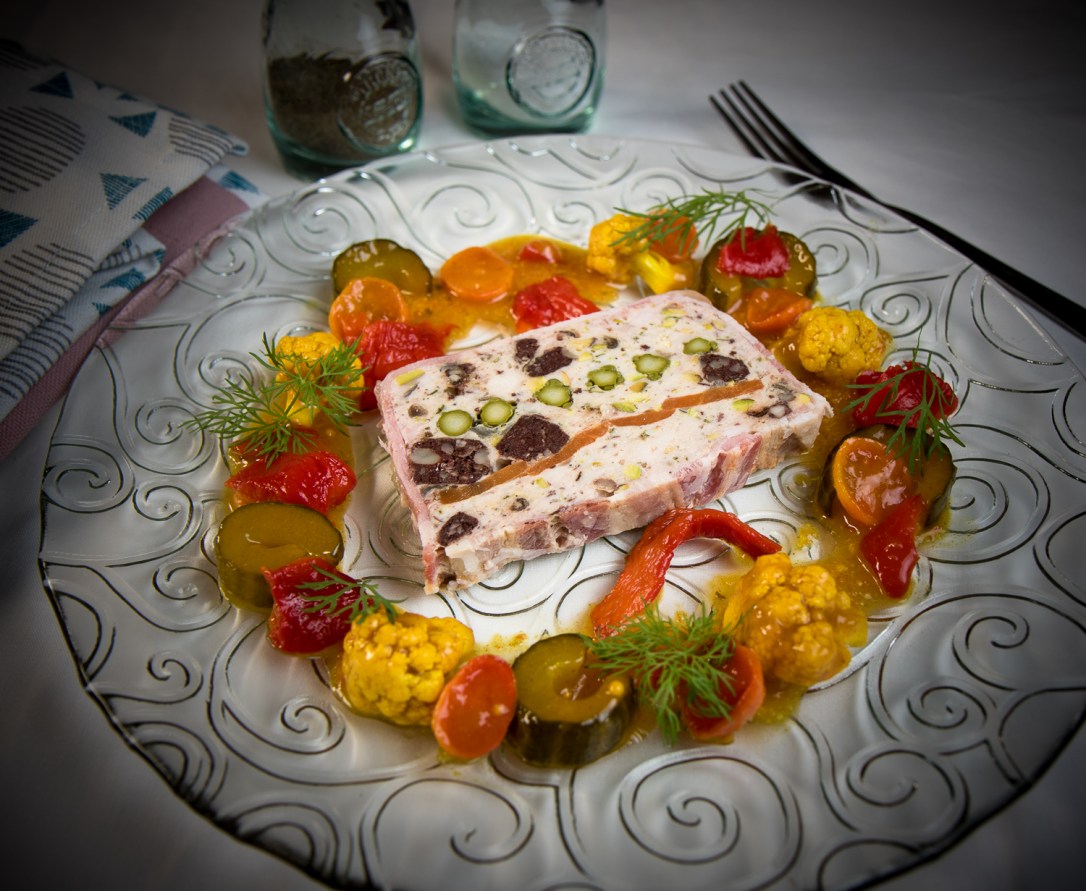
Serving:
Serve your hot soup topped with chopped basil and a drizzle of chilli and garlic oil.
Optional: Grate over the soup with Parmesan cheese.
Accompany the soup with warm savoury croissants.
Enjoy!

chicken, cooking, food blogging, food photography, recipes, restaurant food

Griddled Chicken and Chicken Skin Bites. Served with Salted Peanut and Caraway Bread.

Griddled Chicken
Griddled Chicken with Crispy, Chicken Skin Bites. Served with a Honey and Paprika Yoghurt. Accompanied by a Salted Peanut and Caraway Bread.

This chicken dish is top of the pecking order when it comes to ease of cooking and combination of flavours. Yoghurt and honey sweetness are a perfect match for charred chicken, crisp chicken skin and crusty peanut bread. With roasted tomatoes, that burst to create a light sauce – ‘dip dip hooray’ – it’s a rustic family meal for sharing or to wow your friends during an informal dinner.

Griddled Chicken

Ingredients:

Chicken:  (Serves 4 and needs to marinate overnight)
8 boned chicken thighs – with skin.
200ml Greek yoghurt.
1 clove of garlic – crushed.
1/2 tsp salt.
1/4 tsp black pepper.
1 heaped tsp paprika.
35g honey.
2 tsps of coarse sea salt.

Yoghurt Dressing:
120ml Greek yoghurt.
Pinch of salt.
Pinch of white pepper.
2 tsps of runny honey.
Paprika for sprinkling/dusting.

Garnish:
12 Vine tomatoes.
3 sticks of celery – cut into 6cm lengths.
2 tsps Paprika.
Salt and black pepper for seasoning.
Drizzle of olive oil.
1 tabls chopped parsely.
4-8 curls of butter.
4 cooked corn on the cob – cut in half.

Peanut Bread:
200g strong bread flour. Extra for kneading.
100g salted peanuts – ground.
5g easy bake yeast.
50g unsalted butter.
135ml warm water.
Olive oil.
Sea salt to sprinkle on top of loaf just before baking.
Caraway seeds to sprinkle on loaf just before baking.
Note: Don’t add salt to the dough mix as the salted peanuts contain salt.

Method/cook:

Peanut Bread:
Set oven to gas 8 or 230°C / 450°F
Rub the butter into the flour.
Add the yeast and ground salted peanuts.
Add the warm water and combine to a dough. Add a touch more flour if to wet.
Knead the dough for 5 mins’.
Place dough in a floured bowl, cover with a damp cloth or clingfilm. Rest the dough in a warm place to proof until doubled in size.
Once the dough has double in size, knead again for 3 mins’. You shouldn’t need to flour the surface for the second knead – due to the butter in the dough. But if it does stick, add a little flour as possible to stop it sticking.
Place the kneaded dough in a greased and floured baking tin.
Sprinkle with caraway seeds, sea salt and olive oil. Press into the top of the dough with your finger tips – six or seven good, heavy handed, prods – to incorporate the oil. (see image)
_V2A9228
Cover with cling film or a damp cloth and proof again until doubled in size. Bake for 25-30 mins’ until golden brown. Once baked, turn out onto a baking rack. Set aside.
Tip: If the loaf isn’t crisp on the bottom after baking. Remove from the baking tin and pop back in the oven for 5 mins’

Chicken:
Mix the yoghurt, seasoning, spices, garlic and honey set aside.
Remove skin from the chicken thighs and trim the skin into oblong pieces. (see image)
_V2A9244
Set the skin aside and store in a refrigerator until ready to cook.
In a bowl coat your chicken thighs with the yoghurt mix. Chill overnight.
Once your chicken thighs have marinated you are ready to proceed.
Set oven to gas 6 or 200°C / 400°F.
Place your trimmed chicken skin pieces on a deep baking tray, lined with silicon paper. (see previous image) Season the chicken skins with sea salt and roast until crisp – about 30 mins’.
Note: The baking tray must have high enough sides to retain the oils/fat dripping from the chicken skins.
Once the skins are crisp (they will shrink to yummy bite size morsels) remove from the oven and set aside. Also, save the oils/fat produced from cooking the skins – it’s full of flavour and will be used when serving later.
Set oven to gas 7 or 220°C / 425°F. Ready for the chicken thighs.
For the thighs, heat a griddle pan to a medium heat. Seal and char the marinaded thighs on both sides. Note: Because of the honey, it is easy to over char the chicken so don’t have your griddle pan smoking hot.
Once you have sealed and charred your chicken, place in the oven for 20 mins’ to cook through.

Garnish:
Set oven to gas 6 or 200°C / 400°F.
Place your celery and vine tomatoes on a roasting tray.
Drizzle with olive oil, season and sprinkle generously with paprika.
Place your cooked sweet corn on the tray with your tomatoes and celery to re-heat.
Roast for 30-40 mins’ or until tomatoes are soft and the skins begin to split. The celery will retain a crunch and the sweet corn will be hot. Set aside your garnish and keep warm.
Tip: Cook the garnish at the same time as the chicken skin – save time and energy.

Yoghurt:
Mix the yoghurt, seasoning and honey. Set aside.

Serving:  (Can be served as a sharing dish or plated for each diner.)
To serve plated: Dress each plate with several good teaspoons of the yoghurt dressing – random blobs, splodges or cheffy smears. (Drizzle extra honey, over the yoghurt, if you like the sweetness) Sprinkle over the yoghurt with paprika – be generous.
Next, add two pieces of cooked chicken thigh to the centre of each plate – brush with the fat/oil saved from cooking the skins. Top with several pieces of crispy chicken skin.
Add 3 roasted tomatoes and three pieces of roasted celery to each plate.
Finally, sprinkle each plate with chopped parsley.
Serve with hot corn on the cob and warm wedges of the crusty peanut and caraway bread. Don’t forget your butter curls.

Enjoy!

chicken, food blogging, food photography, recipes, salad, savoury, spices

Spicy Chicken Roulade with a Mango Salad and Dressing. Served on a bed of Quinoa.

Spicy Chicken Salad
Spicy chicken roulade with a mango salad and a mango and lemon dressing.

A quick and tasty chicken salad that’s perfect for an alfresco lunch or dinner.
The chicken can be served hot or cold and makes for a great picnic food also.
This is my first dish to incorporate Quinoa seeds. Quinoa is a wonderful, protein packed, alternative to rice and is gluten free. I will certainly be using it again as it went down well with my family of foodie guinea pigs – Quinoa originates from the Andes funny enough.

Ingredients: (Serves two)

Chicken Roulade:
1 large chicken breast or 2 small breasts.
30g unsalted butter.
Seasoning.
Juice of half a lemon.
For the filling:
2 cloves garlic sliced.
1 medium green chilli finely chopped.
15g fresh ginger chopped.
Juice of half a lime.
1 tsp ground coriander.
1 tsp ground cumin.
1 tsp ground turmeric.
1/2 tsp five spice.
1/4 teaspoon of coarse salt.
Pinch of black pepper.
2 tabls olive oil.
1 red onion finely chopped.

Mango Dressing:
140g of fresh mango.
Juice of half a lemon.
100ml warm chicken stock.
Seasoning.

Quinoa:
80g Quinoa seeds.
350ml chiken or veg’ stock.
Seasoning.

Garnish:
Fresh leaf salad.
10 Slices of red chilli.
4 wedges of lime.
Slices of fresh mango.
Sprigs of fresh coriander or parsley.
Drizzle of olive oil.

Method/cook:

Mango Dressing:
Put all the ingredients into a food processor and blitz until smooth.
Set aside in the refrigerator.

Quinoa: (I used tri-colour seeds)
Rinse the quinoa seeds in cold water.
Bring the seeds to a boil in the stock.
Once boiling simmer, with a lid, for 10 minutes.
Once cooked, drain, season and set aside.

The Roulade Filling:
In a pestle and mortar grind the garlic, chilli, ginger, salt and pepper.
Once ground, add the lime juice and the spices – combine and set aside.
In a frying pan, gently heat the olive and lightly fry the red onion until softened. Once the onions have softened, add your spice mix and lightly cook out the spices for 3 minutes. Set aside to chill in the refrigerator.
Note: A well chilled filling will be easier to roll later when forming the roulade.
Tip: Add a touch more oil if the pan becomes dry.

Prepare Chicken Breast:
Butterfly the chicken breast by slicing along its length. Only cutting halfway into the breast and opening out. (see images)
_V2A7915
_V2A7914
Once you have butterflied the chicken breast, place it between two layers of cling film, or in a polythene bag. Flatten out the chicken breast using a rolling pin, meat mallet or tenderiser.  (see images)
_V2A7917
_V2A7918
Don’t worry if the chicken breast has a tear or hole.
Once the chicken breast has been batted out, season with salt and black pepper. Now cover with a layer of your well chilled spicy filling. (see image)
_V2A7919
Roll up your breast meat and wrap tightly in a layer of cling film – twisting the ends. Wrap in a second layer of cling film and again twisting the ends. (see image)
_V2A7921
The roulade can be made in advance and stored in the refrigerator.

Cooking The Roulade:
Bring a pan of water to a simmer.
Place your roulade, in the cling film, in the simmering water and pop on a lid.
Simmer the roulade for 20 minutes.
I use a saute pan with a lid. (see image)
_V2A7922
The two ramekins stop the roulade from floating about in the simmering water – less risk of the cling film coming undone.
After twenty minutes remove the roulade, still in the cling film, and place in a cold frying pan. Leave the roulade to cool for 10 minutes then remove the cling film. Juices will run out when you cut the cling film.
Note: The roulade will contain juices that will run out when the cling film is removed. You want to retain them.
After removing the cling film, put the frying pan on a low heat and add the butter.
Lightly brown the roulade – being careful not to burn the butter.
Once the roulade has browned (see image) add the lemon juice and set aside to keep warm.
_V2A7923

Serving:
Serve slices of the chicken roulade on a bed of Quinoa.
Arrange fresh slices of mango with the salad leaves – spoon over some of the mango dressing.
Garnish with wedges of lime, coriander herb and slices of fresh chillis.
Drizzle with olive oil.

Enjoy!

baklava, desserts, food blogging, food photography, panna cotta, recipes, restaurant food, sweets, thefoodygrail.com

Wild Blackberry and Baklava Dessert.

Wild Blackberry Panna Cotta and Baklava Dessert.
Blackberry Panna Cotta with an Apricot and Nut Baklava.
Served with Whipped Cream, Sharon Fruit and a Blackberry Sauce.

British hedgerow meets Italian cream meets Ottoman delight.
Wild Blackberries are growing in abundance here in England at the moment. I don’t think I have ever seen so many fruits – it’s a bumper year – but a word of caution.
My first container was half full when an elderly lady appeared with three Great Danes…I will only pick fruits growing above chest height from now on.
After a few hours picking and culling the little black jewels, I put 500g of fruit to one side and froze the rest.
The recipe for today is a Wild Blackberry Panna Cotta with an apricot and nut Baklava. Served with whipped cream, Sharon fruit and a Blackberry sauce.
This dessert can be made in advance, chilled in the refrigerator and served when ready.

Ingredients:

Blackberry Panna Cotta: (makes 5 150ml desserts)
500ml double cream.
200ml skimmed milk.
1 tsp vanilla extract.
1/2 tsp agar agar or setting agent of your choice.
300g fresh blackberries.
70g sugar.
4 tabls water.

Blackberry Sauce:
200g fresh blackberries.
25g sugar.
Juice of 1/2 lemon.
2 tabls water.

Apricot and Nut Baklava: ( makes 20 x 25 tray bake)
15 20cm x 25cm sheets of filo pastry.
300g ground mixed nuts (100g each of walnuts, hazelnuts and almond)
180g melted butter.
150g dried apricots – pureed in a food processor.

for the Baklava syrup:
100g sugar.
210 ml water.
180g honey.

Garnish:
2 ripe Sharon fruits.
15 fresh blackberries.
125ml double or whipping cream.
10g ground and roasted mixed nuts. (optional)

Method/cook:

Blackberry Panna Cotta:
Add the blackberries, water and sugar to a pan and bring to a boil.
Once boiling, turn down the heat, add the agar agar, simmer for 4 minutes.
Next, blend the blackberry and agar agar mix then pass through a fine sieve. Set aside.
Bring the milk and double cream to just boiling. Thoroughly whisk in the blackberry and agar agar mix.
When combined, divide into five 150ml dariole moulds. Leave to set overnight.
When set, and ready to serve, loosen the at the edges then dip the moulds in hot water for 1 minute. Turn out your Panna cottas on to serving plates.

Blackberry Sauce:
Put all the ingredients into a pan.
Bring to a boil and simmer for 4 minutes.
Once simmered, pass through a sieve and set aside to cool.
Once cooled, chill in the refrigerator.

Apricot and Nut Baklava:
Set oven to gas 3 or 160°C/325°F
In your baking tray, place a single sheet of filo pastry and brush well with butter.
Do this with a further 4 sheets of filo – brushing each layer with plenty butter.
Now add a layer of ground nuts Approx’ 8 tabls’ and a layer of apricots. (see image)
_V2A7839
Add a layer of filo and press down. (see image)
_V2A7841
Now brush with butter and again add a further 4 layers of well buttered filo.
Add a further layer of nuts, followed by 5 more buttered layers of filo pastry.
Bake in the oven for 45 mins’ to 60 mins’ until golden brown.

Now make the Baklava syrup:
Place all ingredients into a pan, stir and bring to a boil. Boil for 3 minutes.
Once boiled, turn down the heat and simmer for 5 minutes. Set aside.

Once the Baklava has baked, cut into squares. Leave to cool and then pour over the warm Baklava syrup.
Leave to soak for several hours – preferably overnight.
(see image – minus a few irresistible squares)
_V2A7843

Serving:
Turn out your Panna Cottas on to serving plates.
Add two squares of Baklava.
Spoon on ripe Sharon fruit.
Top your Panna Cotta with whipped cream and Blackberry sauce.
Garnish with fresh blackberries.
Optional: top cream with ground and roasted mixed nuts.

Enjoy.

bread, broth, food blogging, food photography, oxtail, pickles, quenelles, recipes, restaurant food, savoury, soup, thefoodygrail.com

Glazed Oxtail with Prawn Quenelles, Oxtail Broth and Pickled Radish. Accompanied by Mini Miso buns.

Glazed oxtail in an oxtail broth.
A rich glazed oxtail dish with prawn quenelles, pickled radish and mini miso buns.

“Oxtail and Prawns!!” I hear you exclaim. The same indignation, to my choice of ingredients, was forthcoming from two family members. Not one to take umbrage, I set out to offer them the ‘proof in the pudding’ as it were.
Later that day, the soothsayers of culinary fusion were not only eating ‘oxtail and prawns’ but their negative words also.

Ingredients:

Oxtail: makes approx’ 1.5 litres of broth.
600g oxtail or 4-6 cuts of oxtail.
270g celery or 4-5 sticks – chopped.
150g red onion or 2 small red onions – chopped.
150g carrot or 1 large carrot – peeled and sliced.
50g unsalted butter.
1.2 litre of rich beef stock. One Knorr rich beef stock pot is fine.
1/2 litre of water.
3 tsps tomato puree.
2 bay leaves.
2 sprigs of fresh thyme.
2 tsps chopped parsley.
2 garlic cloves – sliced.

Glaze:
300ml rich beef stock. Half a Knorr rich beef stock pot is fine.
3 dessert spoons of honey.
2 dessert spoons white wine vinegar.
1 dessert spoon of light soy sauce.
Black pepper to season.

Prawn Quenelles: makes approx’ twelve if using teaspoons.
200g cooked prawns.
20ml double cream.
1 egg white.
1/2 tsp wasabi paste.
Seasoning – salt and pepper.

Pickled Radish:
4-5 radish sliced.
1 level dessert spoon of sea salt.
50ml white wine vinegar.
1 1/2 dessert spoons of sugar.

Mini Miso Buns: makes approx’ 12 buns.
200g strong bread flour.
125ml warm water.
1 tsp sugar.
7g fresh yeast or 1 dessert spoon of dried yeast or 1 tsp of easy yeast.
2 tsps ground coriander.
2 heaped tsps miso paste.
1 egg yolk mixed with 2 tabls of water for egg wash.
1 tsp of caraway or sesame seeds.
Extra flour for kneading.

Garnish:
1 spring onion cut in to fine strips.

Method/cook:

Oxtail:
Set oven to gas 7 or 220°C/425°F.
Place cuts of oxtail in a baking tray. Drizzle with oil and roast in the oven until well browned. Aprox’ 1 to 1 1/2 hours.
While the oxtails roast start to prepare the broth.
Melt the butter in a large pan.
Add the celery, onion and carrot to the butter and sweat until soft.
Next, add the tomato puree and cook out for several minutes.
Add the stock, water, herbs and garlic and bring to a simmer.
Once simmering remove from the heat.
When the oxtails have roasted, add them to the broth and simmer for 2-3 hours, or until the oxtail meat is tender.
When the oxtails are cooked turn off the heat and skim off any fat. Leave the broth and oxtails to cool in the pan. Once cooled remove the oxtails and set aside.
Season the broth with salt and pepper. Blend the broth with a hand blender and pass through a sieve. Set aside.

Mini Miso Buns: (Don’t add salt as the miso paste is salty.)
Firstly mix the flour with the coriander – set aside.
If using fresh yeast or active dried yeast, dissolve yeast with the warm water and the sugar.
After yeast has fermented, and frothed up, add to the flour and coriander. Form a dough and kneed for 5 minutes.
Place dough in a floured bowl. Cover the dough and leave to prove, in a warm place, until doubled in size.
Next, on a floured surface, roll out the dough to approx’ 13cm x 11cm. Spread with miso paste (see image)
_V2A7769
Fold the dough over a 1/3 (see image)
_V2A7770
Fold the dough over another 1/3 to create an oblong (see image)
_V2A7771
Spread more miso paste over the top half. (see image)
_V2A7772
Fold the bottom half of the dough up over the top half. (see image)
_V2A7773
Roll out the pastry to approx’ 20cm x 30cm. (see image)
_V2A7776
Roll up the pastry in to a sausage shape. (see image)
_V2A7777
Once rolled, cut in to 10-12 slices. (see image)
_V2A7778
Lightly dust each slice with flour and press down with the palm of your hand. (see image)
_V2A7779
Place your dough portions on a baking tray lined with parchment paper. Brush with egg wash and sprinkle with caraway or sesame seeds. Leave to prove and double in size. (See image)
_V2A7781
Once proved, bake at gas 7 or 220°C/425°F for 20 minutes.
Once baked place on a cooling rack. (See image)

Once cooled, store the buns in an airtight container.

Prawn Quenelles:
Place prawns, egg white, wusabi and seasoning in a food processor.
Blitz to a smooth paste.
Add the cream and blitz until thoroughly combined.
Using two teaspoons, form quenelles with the prawn mix.
Steam the quenelles in a bamboo steamer over a pan of simmering water for 4 minutes. (see image)
_V2A7795
Note: If you don’t have a steamer, poach the quenelles
in simmering water.
When the quenelles are cooked, remove from the steamer, and set aside.

Pickled Radish:
In a dish, sprinkle the slices of radish with the salt.
Leave for 2 hours and drain off any liquid.
Rinse the radish in cold water and then dry.
Heat the vinegar and sugar in a pan. Once boiling pour over the radish.
Leave the radish for 1-2 hours to pickle. Set aside.

Glaze:
Set oven to gas 7 or 220°C/425°F
Place all the glaze ingredients in to a saute pan and bring to a simmer.
Add the previously cooked oxtails.
Spoon over the glaze and place in the oven to re-heat.
Cook the oxtails in the glaze for 35-40 mins. Baste at 10 minute intervals.
When the oxtails are heated, remove the pan from the oven, place on the hob, and continue to reduce the glaze for several minutes while basting the oxtails.
Set aside and keep warm.

Now that all the prep is done it’s time to put the dish together.

Re-heat the broth and the quenelles.
Place a ladle full of broth into each of your warm serving bowls.
Place a glazed oxtail into each bowl, followed by portions of quenelles and pickled radish.
Garnish with spring onion and drizzle with extra glaze.

Enjoy.

chocolate, chocolate cream, desserts, food blogging, food photography, ice cream, licorice, liquorice, recipes, restaurant food, sweets, thefoodygrail.com

Fruit Tart with Liquorice Ice Cream and Blackcurrant Jelly.

fruit tart with liquorice ice cream
Fruit Tart with Liquorice Ice Cream. Served with Chocolate Cream and Blackcurrant Jelly

A melt in the mouth sweet pastry filled with a tangy fruit compote and topped with a dark chocolate cream. But it doesn’t stop there; Jelly and ice cream will take you back to your childhood…Mmm liquorice and blackcurrant.

Ingredients: Makes 6 tarts.

Liquorice Ice Cream: (makes approx’ 500ml)
3 egg yolks.
75g sugar.
300ml whole milk.
30ml double cream.
20g skimmed milk powder.
1/4 tsp salt.
1 tsp vanilla extract.
1 1/2 tspns liquorice powder.
1 tsp liquorice syrup.
1g ice cream stabiliser. (Optional)

Pastry for tart cases:
200g plain flour.
125g chilled butter.
50g caster sugar.
1 beaten egg.
Pinch of salt.

Blackcurrant Jelly:
100ml blackcurrant cordial (50% juice).
100ml summer fruit juice.
1 level tsp Agar Agar or jelling agent you prefer.
Note: I prefer agar agar as it sets to a gel at room temperature and makes wonderful soft jellies.

Fruit Compote:
180g Frozen summer fruits.
3 dessert spoons sugar.
Juice of 1/2 lemon.
3 tbls of cold water.
1 heaped tsp of cornflour.

Chocolate Cream:
150g Dark chocolate (70% cocoa)
110ml skimmed milk.
35ml double cream.
1 1/2 tsps sugar.
1 tsp vanilla extract.

Garnish:
6 fresh strawberries
6 sprigs of mint.
Zest of 1 large orange.
Or use fresh fruits of your choice.

Method/cook:

Ice Cream:
Mix 2 dessert spoons of the sugar with the ice cream stabiliser. Set aside.
In a thick bottomed pan heat the milk, cream, milk powder, salt vanilla, liquorice powder and syrup to 82°C / 180°F. Note: Bring to a simmer if you don’t have a thermometer.
When the milk mixture has reached the required temperature, remove from the heat, and leave to cool for 3 mins’. Stir in the sugar and stabiliser mix.
With a whisk, cream together your egg yolks and remaining sugar in a heat proof bowl.
Now add your hot milk mixture to the egg yolks and sugar to create a custard – combine with a hand whisk.
Note: Make sure that your milk mixture isn’t to hot as it will scramble the egg.
Pour the custard back into your thick bottomed pan, and on a low heat, stir until the custard thickens. When the mixture coats the back of a spoon remove from the heat.
Note: If you have a thermometer. Heat and stir the custard to 60°C / 140°F and cook until the custard has thickened, about 5 mins’.
Strain the custard into a clean bowl and leave to cool.
Once cool refrigerate until chilled.
Once chilled, churn your custard in an ice cream maker.
Store your finished ice cream in a suitable container in the freezer.
Note: You can make this ice cream without the stabiliser but it will freeze to a firmer texture.

Jelly:
Heat all the ingredients to just boiling.
Pour the hot fruit liquid into an oblong mould or dish, lined with cling film. Pop any bubbles that may form. Set aside to set. (See image)
_V2A7347

Tart Pastry cases:
Rub the chilled butter into the flour and salt.
Combine the sugar and the beaten egg.
Make a dough by combining the the egg mix to the flour mix.
Wrap in cling film and chill until pastry is firm.
Note: Initially this pastry mix is quite sticky. Have some extra flour ready to sprinkle over your hands when combining into a dough. Refrigerate the dough overnight, if you can, as it will help when it comes to rolling out.
When the dough has chilled divide into 6 equal portions and roll each piece into a circle – large enough to line 10cm tart cases.
Line six 10 cm tart cases with pastry. Bake blind for 10 minutes at gas 6 or 200°C/400°F
After 10 mins’ remove tart case from the oven. Remove parchment and baking beans and bake for a further 5 mins’ at gas 3 or 160°C/325°F.
Once baked remove from oven and leave to cool.
Note: Baking blind – line uncooked pastry tarts with parchment and weight down with baking beans, dried peas or rice. This stops the bases of the tarts rising (See image)
_V2A7340

Fruit Compote:
Except for the cornflour, in a pan, heat all the ingredients to a simmer.
Mix the cornflour with 2 tabls of water and add to the simmering fruit mixture.
When fruit mixture thickens remove from the heat and set aside to chill.
Note: Don’t be tempted to add extra sugar to the compote. A slight tang or sourness is required to balance out the overall sweetness of the final dish.

Chocolate Cream:
Put all the ingredients into a pan and heat gently. As the chocolate melts whisk all the ingredients together until smooth.
Place in a clean receptacle to cool. Once cooled, place in refrigerator to firm to a piping consistency.

To serve:
Dust the edge of each tart case with icing sugar.
Half fill the tart cases with fruit compote. Top with a swirl of chocolate cream.
Turn out the jelly and cut into cubes. Arrange on the plate with slices of strawberry.
Tip: Slices of strawberry will stick to the sides of the moist jelly cubes – it gives a little height and interest to the dish.
Pipe more chocolate swirls around the plate.
Place a scoop of ice cream topped with orange zest with your finished dish.
Enjoy.

food blogging, food photography, pickles, recipes, restaurant food, savoury, terrine, thefoodygrail.com

Chicken Terrine with Sweet Pickle.

Chicken Terrine.
Chicken Terrine with Asparagus, Pistachio and Black Pudding. Served with a Sweet Pickle.

A moist Chicken Terrine, that is so easy to make, you won’t buy from the Deli’ ever again. For those that don’t like liver this Terrine is worth a try – as it doesn’t contain any.

Ingredients:

Terrine: Serves 8-12
Non-stick loaf tin with approx’ outer measurement of 25cm x 13cm x 6cm.
500g chicken thigh meat – (weight without skin and bone)
120g or 2 slices of black pudding – cut into small cubes.
1 red onion – finely chopped.
knob of butter.
1 large egg – beaten.
100ml double cream.
50g crushed pistachio nuts. (don’t grind)
1 tsp salt.
1 tsp black pepper.
Dessert spoon of chopped Thyme.
Dessert spoon of chopped Tarragon.
2 tabls Madeira wine. (optional)

For lining and layering the tin:
12-14 rashers of streaky bacon.
3 bay leaf.
1 medium carrot.
6 Asparagus spears.

Sweet Pickle:
100g cauliflower – break or cut into small florets.
5 radish sliced.
50g red pepper – diced.
3 spring onion – sliced.
100g cucumber – remove seeds and cut into thick slices.
Coarse salt.

For the pickle sauce:
250ml white wine vinegar.
2 tsps Tumeric.
1 tsp ground Coriander.
2 tsps English mustard.
1 tsp Mustard seeds.
1/2 tsp ground Cumin.
4 heaped tsps Cornflour.
80g of sugar.

Garnish:
Sprigs of fresh Dill.
1 large red or yellow pepper roasted – skin and seeds removed then sliced.
Fresh slices of crusty bread – toasted. Bread of your choice.

Method/cook:
Start by making the pickle first. Veg’ has to be salted for 24 hours.
Add all your prepared vegetables to a bowl.
Generously sprinkle with coarse salt and mix.
Add the veg’ and salt mix to a colander and sit over a bowl – cover with a cloth.
Leave the covered veg’ for 24 hours in a cool place.
After 24 hours rinse the salted veg’ in cold water. Set aside.
Now prepare the pickle sauce.
Mix the spices, mustard and cornflour with 2 tabls of the vinegar. Make a paste.
In a pan, bring the remaining vinegar and sugar to a boil – then simmer.
Add the spice and cornflour mix to the simmering vinegar – whisk until thickened.
Taste the pickle sauce. If more sweetness is required add a little more sugar, a teaspoon at a time, until you are happy with the flavour. 80g of sugar is usually enough, but everyone’s taste buds are different.
When you are happy with the sauce, remove from heat, and stir in your rinsed veg’ Place your Sweet Pickle into a sterilised jar or airtight container. Leave to cool.

Chicken Terrine:
Peel carrot and cut into 3 lengths. Cut each length into thin strips. Blanch in boiling water for 3 minutes. Cool and set aside. (see image)
_V2A6907
Blanch the Asparagus spears in boiling water for 3 minutes. Cool and Set aside.
Lightly fry the onion in the butter until soft.
Add the black pudding cubes to the onion and fry for 3 minutes. Set aside and cool.
Add your chicken meat to a food processor and blitz until smooth – about a minute.
Empty blitzed chicken meat into a mixing bowl.
Tip: Place your mixing bowl over crushed ice to keep the meat cool.
To the chicken, mix in the beaten egg followed by the cream.
Now add the salt, pepper, herbs, cooked black pudding, pistachio nuts and the Madeira – thoroughly mix. Set aside.
Line your loaf tin with streaky bacon, leaving a 5cm overlap all the way around. The overlap can be folded over to seal the top of the terrine later.
Time to layer your Terrine.
Put a layer of the chicken mix in the base of the loaf tin.
Now layer all of your Asparagus onto the chicken layer – lightly press down.
Add another layer of chicken mix over the Asparagus – smooth with a spoon.
Add your slices of carrot to create a layer of carrot.
Add the rest of the chicken mix over the carrot layer and smooth with a spoon.
Fold over the overlaps of streaky bacon, so the final layer of chicken mix is covered. Place 3 bay leaves on top (see image) and seal the top with a layer of tin foil.
_V2A6908
Cook your Terrine in a Bain Marie – see below.  Gas 4 or 180°C/350°F for 1hr 30 mins with the foil on. Then cook a further 30 mins’ without the foil.
Once cooked, remove the Terrine from the oven and cover with a fresh piece of foil. Sit in a clean tray and place a weight on top. I use an oblong glass dish filled with water. Use a brick if you have one. Leave to cool and refrigerate over night.
To turn the Terrine out, run a thin bladed knife all around the edge of the Terrine. Turn the Terrine over onto a board or plate and turn out – give a tap or shake (See image)
_V2A6922

Bain Marie method: Place your loaf tin, with prepared Terrine, in a roasting tray and top up with boiling water until water reaches half way up the loaf tin.
Tip: Place your roasting tray, with loaf tin, in the oven then add the boiling water – much safer than lifting a tray with boiling water sloshing around.

Serving:
Serve a slice of the chilled Terrine with your Sweet Pickle.
Garnish with slices of roasted red/yellow pepper and sprigs of fresh dill.
Toasted and buttered bread of your choice.
Tip: Pick some of the veg’ out of the pickle and blend the rest. It makes a great sauce.

cooking, desserts, food blogging, food photography, ice cream, recipes, restaurant food, sponge pudding, sweets, thefoodygrail.com

Ginger and Apricot Steamed Sponge with Irish Liqueur Ice Cream

Ginger and Apricot Steamed Sponge Pudding
Ginger and Apricot Steamed Sponge with Irish Liqueur Ice Cream.

Who doesn’t love a warm steamy pudding?  Not sure about you, but there are no hands up in our house. I do like a thick English custard with my steamed pudding, but ice cream seems more befitting for the time of year.

Ingredients: (Makes 6 – 8cm x 5cm puddings)

Sponge:
175g softened butter.
175g caster sugar.
175g self raising flour – sieved.
1 tsp bicarbonate of soda – sieved.
3 large eggs – room temperature.

6 individual pudding moulds – 8cm x 5cm.
Butter for greasing.
8 fresh ripe apricots.
50g stem ginger – chopped. (See recipe below or buy ready made)
12 heaped tsps golden syrup.

Ice Cream:
150ml semi skimmed milk.
320ml double cream.
50g sugar.
50ml Irish Cream Liqueur.
Tip: If you want a stronger alcohol taste add more liqueur and reduce the milk by the same amount – ie: extra 20ml liqueur reduce milk by 20ml.

Stem Ginger recipe and stock syrup:
260g peeled fresh ginger – sliced.
400ml water.

Stock Syrup:
500ml water.
200g sugar.
1 slice of orange.
1 slice of lemon.
1 bay leaf.
3 cardamon pods.
3 cloves.
5cm cinnamon stick.

Method/cook:

Ice Cream:
Bring all the ingredients to a simmer – leave to cool.
Once cooled add the mixture to ice cream maker to churn.
After approx’ 50 minutes it will form a soft ice cream.
Transfer soft ice cream to a plastic container – with lid – and pop in the freezer for several hours.
Note: Ice cream made with ice cream makers still need to be popped into a freezer – don’t expect the ice cream maker to give you a finished product. Once the ice cream reaches an almost frozen state the mixing paddle will stop turning, but not all the mixture is frozen. Add this extra freezing time to your timings. Ice cream makers with integrated compressor are best.

Stem Ginger:
In a pan, with a lid, simmer the sliced ginger in the 400ml of water until soft – 40-60 mins’. Be careful that the pan doesn’t boil dry.
While the ginger simmers make the stock syrup.
Put all the stock syrup ingredients into a pan. Bring to the boil and simmer for 30 minutes.
When the ginger is soft add the stock syrup and simmer until liquid is reduced by half and syrup thickens.
Store in sterilised jam jars.

Sponge: 
Firstly prepare the pudding moulds.
Grease each mould with butter.
Pop a small amount of chopped stem ginger into the bottom of each mould.
Add a 2 heaped teaspoon of golden syrup to the bottom of each mould.
Slice 6 apricots and line each mould. (See image)
_V2A6300

Once the moulds are lined, prepare the sponge mix.
Crack the eggs into a dish and beat with a fork until well mixed. Set aside.
Seive the flour and bicarb’ of soda together. Set aside.
Cream butter and sugar with an electric whisk – or use a wooden spoon if you feel that you need a work out.
Once the butter and sugar are well creamed add the beaten egg a little at a time.
Once all the egg has been incorporated fold in the sieved flour and bicarb’ of soda.
Divide sponge mixture between the 6 moulds. (see iamge)
Note: Chilled eggs will cause the mixture to split, so use eggs that have been stored at room temperature. If the mixture splits before all the egg has been added, mix in a dessert spoon or two of the sieved flour – this should fix it.
_V2A6304
Cover each pudding with parchment paper and then a piece of tin foil. Secure with elastic bands. (see images)
_V2A6301
Note the fold in the parchment paper – this is to allow the sponges to rise during steaming.
_V2A6305

Steam the sponges for 30-35 mins.
To steam the sponges, line the base of a large pan with baking beans or a wire trivet.
Just cover the beans or trivet with water and bring to a simmer.
Add the sealed puddings to the simmering water and top up with boiling water so the level reaches half way up the pudding moulds. (see image)
_V2A6307
Put a lid on the pan and steam the puddings for 35-40 minutes on a low flame.
Once cooked, remove parchment paper and foil. Turn out onto plates and serve with the ice cream, fresh apricot slices and fresh cream.
Enjoy.

duck breast, food blogging, food photography, recipes, savoury

Duck Breast with Rhubarb and Orange Chutney

duck with rhubarb and orange chutney.
Duck breast served with spiced stuffed peppers and a rhubarb and orange chutney.

You’d be ‘quackers’ not to try this for yourself.

Ingredients:  (serves two)
2 duck breasts.
seasoning – salt and pepper.

Chutney:
1 stick rhubarb.
Juice of 1 large orange.
Zest of half an orange.
1/4 onion – diced.
1/2 clove garlic – crushed.
100ml chicken stock.
1 dessert spoon of mango chutney.
2 tsps sugar.
1 dessert spoon of olive/veg’ oil.
seasoning – salt and pepper.

Stuffed Mini Peppers:
8 mini sweet peppers – washed.
80g couscous.
110ml hot chicken stock.
1/4 onion finely diced.
1 button mushroom finely chopped.
1/2 chilli finely diced.
1/2 tsp turmeric.
1/2 tsp ground coriander.
1/2 tsp paprika.
4 dessert spoons olive/veg’ oil.

1 dessert spoon of mango chutney.
2 sun-dried tomatoes – chopped.
seasoning – salt and pepper.
drizzle of olive/veg’ oil for roasting peppers.

Garnish/salad:
1 bunch of watercress – washed.
zest of 1/2 an orange.
1/2 chilli sliced.
2 sun-dried tomatoes – sliced.
Drizzle of olive oil.

Method/cook:
Firstly prepare the stuffed peppers.
In a heat proof dish add your hot chicken stock ( bring the stock to a simmer) to the dry couscous. Leave to soak for ten minutes.
Add oil and spices to a frying pan and gently warm – don’t overheat as the spices will burn.
Add onion, chilli and mushroom to the warm spices and cook until onions are soft. Add a touch more oil if the pan becomes dry.
Once the onions are soft, add the contents of the pan, the sun-dried tomatoes and mango chutney, to the soaked couscous. Season with salt and pepper and thoroughly mix. (Keep the pan for cooking chutney as it contains a residue of flavour.}
Cut the top off the peppers – see image:

_V2A4705

Stuff the peppers with the couscous mix and place in a baking tray.
Replace the tops and secure with cocktail sticks.
Wrap a ring of foil around the peppers to keep them upright – see image:
_V2A4708

Drizzle your peppers with oil and roast for 30 minutes at  gas 6 or 200°C / 400°F.
When the peppers are cooked, carefully trim off any stalks from their bottoms. Keep warm.

Rhubarb and Orange Chutney: 
In the frying pan add the oil, onion and garlic – lightly fry until onions are soft.
Then, add the orange juice, zest, rhubarb, stock, mango chutney and sugar – place a lid on the pan and gently cook until rhubarb is soft.
Once the rhubarb is soft blend the ingredients and season with salt and pepper – set aside.

The Duck Breast:
Set oven to gas 7 or 220°C / 425°F
Score along the skin of each duck breast – 6 to 8 cuts on each breast.
Season each breast with salt and pepper.
Place both duck breast skin side down in a medium hot frying pan.
Fry duck breasts until skin is golden brown.
When skin is golden brown, seal the flesh sides of duck breast and place in pre-heated oven for 8-10 minutes – if you like your meat pink. 20 minutes for well cooked but not over done.
When cooked, leave to rest for 4 minutes before slicing.

Garnish/salad:
Mix together your washed watercress, orange zest, sliced chilli.

Serving:
Slice your cooked duck breast and serve with the stuffed peppers, watercress salad and rhubarb and orange chutney.
Garnish with slices of sun-dried tomatoes. Drizzle with olive oil.

Enjoy this simple but tasty dish.

cake, desserts, food blogging, fruit, gateaux, layer cake, recipes, sweets, thefoodygrail.com

Chocolate Layer Cake

One for the Chocoholic…well a slice at least.

Chocolate sponge dessert.
A moreish chocolate sponge cake with layers of summer fruits and fresh cream. Crème de Cassis and a chocolate cream, flavoured with star anise, add a touch of luxury.

I had to make something sweet to show off my latest charity shop purchases – two retro jugs, a 60’s glass plate and a nondescript little pot – all for a tenner. The items take me back to my childhood with so many memories.
My mother was always baking when I was younger, a lot younger, and this is the sort of moist chocolatey delight we as a family enjoyed. After a hard day, at a local farm, picking muddy King Edwards from a field that looked like the Somme it was a joy to sit down with a slice of cake and a hot chocolate. The money wasn’t great, but it came in handy to buy new pairs of wellingtons every week, as the thick, gloopy mud claimed so many.

Ingredients:

Chocolate Genoise Sponge:
4 eggs.
115g caster sugar.
90g plain flour.
25g cocoa powder.
55g melted butter.
1tsp vanilla extract/flavouring.

Chocolate Cream Coating:
400g dark chocolate – 70% cocoa.
300ml milk.
100ml double cream.
2 tsp sugar.
3 star anise.

Fruit Filling and Sauce:
500g Frozen summer berries – use mixed fresh berries if you like.
100g sugar.
Juice of 1/2 a lemon.
5 tablespoons of Crème de Cassis. Or use Blackcurrant juice if you prefer.
4 tbls cold water.
4 tsps cornflour mixed with 5 tbls cold water.

Cream For Filling:
100ml whipped cream.

Chocolate Flakes/scrolls:
200g Dark chocolate:

Garnish to serve:
Fresh summer fruits – I chose raspberries.
300ml Double creme.

Method/cook:

Chocolate Genoise Sponge:
Grease and line a 20cm x 25cm baking tin with greaseproof paper.
Set oven to gas mark 6 or 400°f/200°c
Sieve the flour and cocoa powder together into a bowl – set aside.
In a small dish mix together the melted butter and vanilla – set aside.
Crack the eggs into a heat proof bowl, add the sugar, and whisk over a pan of simmering hot water, with a electric whisk, for 5 minutes.
When the egg and sugar mixture has thickened and increased in volume, to ribbon stage, remove from the heat.
Using a balloon whisk, gently fold half of your sieved flour and cocoa powder, and half of your melted butter mix into the egg mixture.
Fold the remaining flour, cocoa and melted butter into the egg mixture.
Pour sponge mix into prepared cake tin.
Bake at gas mark 6 or 400°f/200°c for 20-30 minutes on middle shelf.
Once baked leave to cool.

Chocolate Cream Coating:
Break 200g of the chocolate into small pieces and place into a pan along with the milk, cream, sugar and star anise. Bring to a simmer and gently stir the ingredients until all the chocolate has melted. Turn the heat to its lowest setting and leave for 5 minutes for the star anise to impart a subtle aniseed flavour.
After the 5 minutes, remove milk and chocolate mix from the heat. Strain to remove star anise and leave to cool for 30 minutes.
Melt the rest of the chocolate (200g) in a heat proof bowl over a pan of simmering water. Once melted add to the cooled milk mixture and whisk by hand to incorporate all the ingredients into a chocolate cream. It will thicken to a fudge texture as it cools further.

Fruit Filling and Sauce:
Place all ingredients, except cornflour and water mix, into a pan.
Place pan, with lid, on a low heat and bring to a simmer to dissolve the sugar.
Once the the ingredients are simmering stir in the cornflour and water mix.
As soon as the fruit mixture thickens, remove from the heat and place in a clean bowl to cool. Once cooled, refrigerate until chilled through.

Chocolate Flakes/scrolls:
Melt chocolate, in a heat proof bowl, over simmering hot water.
Once melted, pour chocolate onto work surface, marble slab – or, as I do, a piece of slate. See image:_V2A4098
Leave the chocolate to set at room temperature.
Note: If the chocolate is too cold it won’t form scrolls/shavings so don’t be tempted to speed up the cooling by placing it in the refrigerator.
When the chocolate has set, scrape a knife along the surface of the chocolate to create the shavings. See Image:_V2A4106
Use the blade of the knife, horizontal against chocolate, and drag from top to bottom across the surface of the chocolate. Keep the top of the knife slightly tilted towards you. Don’t dig the blade into the chocolate, just add enough pressure to create the scrolls/shavings.
Keep scraping across the chocolate until you have enough flakes/scrolls to cover the cake – top and sides. Transfer the choc’ flakes/scrolls to a clean tray and place in the refrigerator to chill.

Building The Cake:
For the final cake I cut 4 oblong sponge slices- approx’ 12cm x 22cm and 2cm in thickness. See image:_V2A4094
Drizzle each slice of sponge with Crème de Cassis or blackcurrant juice. See Image:_V2A4096
Pipe, narrow, lines of cream onto three of the slices and spoon fruit filling between the lines of cream. See image:_V2A4099

Now stack the sponges to create the layers – lightly firm and remove any cream that may ooze out. See Image:_V2A4101

Cover the stacked sponge with the chocolate cream: See image:_V2A4103

Now cover your cake with your chilled chocolate flakes/scrolls.
Finally, pass the remaining fruit filling through a fine sieve to be served as a sauce.

Tip: If the sauce is to thick after chilling just add a little more Crème de Cassis or blackcurrant juice.

Serve:
Serve your final cake with fresh pouring cream, fresh fruits of your choice and the fruit sauce.
Enjoy.