Welcome to my 'foody' food bearing blog. Now that my blogging journey has begun, and the first shallot has been peeled, I hope to inspire kitchen creatives in a quest to find their 'foody grail'. All recipes are my own as are the images.
Orange, Cardamom and Chocolate Biscuits – Made to Dunk.
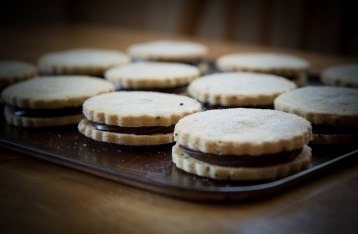
Made for the ‘dunker’ and I am not talking Norwegian Hounds here. If, like me, you like to dip your biscuits without the frustration of ‘biscuit subsidence’, give these hardy dunkers a go. With a crisp biscuit and an indulgent chocolate cream they are a delight to eat.
Ingredients: Makes 11 x 6cm biscuits.
Biscuit:
110g softened butter.
170g icing sugar – sieved.
210g plain flour – sieved.
1 tsp cardamom seeds.
Zest of 2 oranges.
Caster sugar for sprinkling over biscuits – before cooking.
Extra flour for rolling out biscuits. Tip:If cardamom isn’t your thing, then replace with a teaspoon of ground coffee – delicious.
Biscuit:
Set oven to gas 3 or 160°C / 325°F
Thoroughly mix the butter and icing sugar.
Add the orange zest and cardamom seeds – mix.
Add the flour and make into a dough.
Set aside to chill for several hours or overnight.
Once chilled. Roll out the dough to 4mm in thickness.
Cut out rounds – I used a 6cm cutter – and place on a baking tray lined with parchment. Sprinkle each biscuit round with caster sugar.
Bake the biscuits for 15-20 mins’ on the middle shelf.
Once baked transfer to cooling racks – leave until cool and crisp. Note: The biscuits will be soft on the bottom when hot – they will firm and crisp up once cool.
Chocolate Cream Filling:
Place all the ingredients into a heat proof bowl and sit over a pan of simmering water.
When the chocolate and butter has melted, combine all the ingredients with a hand whisk. Remove the bowl from the simmering water and set aside.
Making the Biscuits:
Pipe the warm chocolate cream onto one side of the biscuit. Top with a second biscuit to create a biscuit sandwich. (see image)
Store in an airtight container in the refrigerator.
Serving:
Serve with a cup of coffee or tea and dunk to your hearts content.
Enjoy.
Spicy chicken roulade with a mango salad and a mango and lemon dressing.
A quick and tasty chicken salad that’s perfect for an alfresco lunch or dinner.
The chicken can be served hot or cold and makes for a great picnic food also.
This is my first dish to incorporate Quinoa seeds. Quinoa is a wonderful, protein packed, alternative to rice and is gluten free. I will certainly be using it again as it went down well with my family of foodie guinea pigs – Quinoa originates from the Andes funny enough.
Ingredients: (Serves two)
Chicken Roulade:
1 large chicken breast or 2 small breasts.
30g unsalted butter.
Seasoning.
Juice of half a lemon. For the filling:
2 cloves garlic sliced.
1 medium green chilli finely chopped.
15g fresh ginger chopped.
Juice of half a lime.
1 tsp ground coriander.
1 tsp ground cumin.
1 tsp ground turmeric.
1/2 tsp five spice.
1/4 teaspoon of coarse salt.
Pinch of black pepper.
2 tabls olive oil.
1 red onion finely chopped.
Mango Dressing:
140g of fresh mango.
Juice of half a lemon.
100ml warm chicken stock.
Seasoning.
Quinoa:
80g Quinoa seeds.
350ml chiken or veg’ stock.
Seasoning.
Garnish:
Fresh leaf salad.
10 Slices of red chilli.
4 wedges of lime.
Slices of fresh mango.
Sprigs of fresh coriander or parsley.
Drizzle of olive oil.
Method/cook:
Mango Dressing:
Put all the ingredients into a food processor and blitz until smooth.
Set aside in the refrigerator.
Quinoa: (I used tri-colour seeds)
Rinse the quinoa seeds in cold water.
Bring the seeds to a boil in the stock.
Once boiling simmer, with a lid, for 10 minutes.
Once cooked, drain, season and set aside.
The Roulade Filling:
In a pestle and mortar grind the garlic, chilli, ginger, salt and pepper.
Once ground, add the lime juice and the spices – combine and set aside.
In a frying pan, gently heat the olive and lightly fry the red onion until softened. Once the onions have softened, add your spice mix and lightly cook out the spices for 3 minutes. Set aside to chill in the refrigerator. Note: A well chilled filling will be easier to roll later when forming the roulade. Tip: Add a touch more oil if the pan becomes dry.
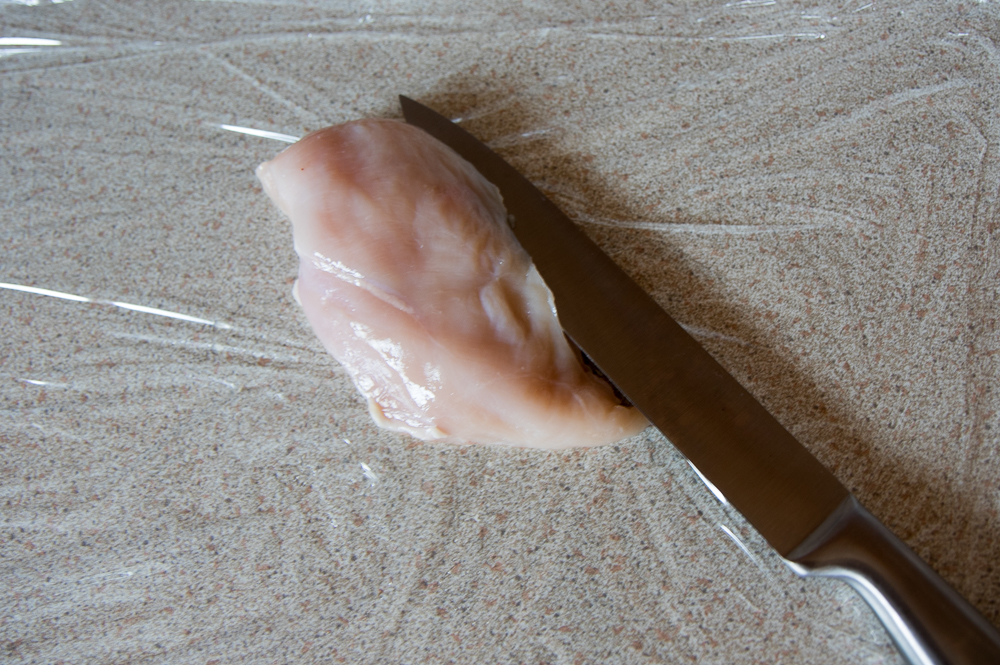
Prepare Chicken Breast:
Butterfly the chicken breast by slicing along its length. Only cutting halfway into the breast and opening out. (see images)
Once you have butterflied the chicken breast, place it between two layers of cling film, or in a polythene bag. Flatten out the chicken breast using a rolling pin, meat mallet or tenderiser. (see images)
Don’t worry if the chicken breast has a tear or hole.
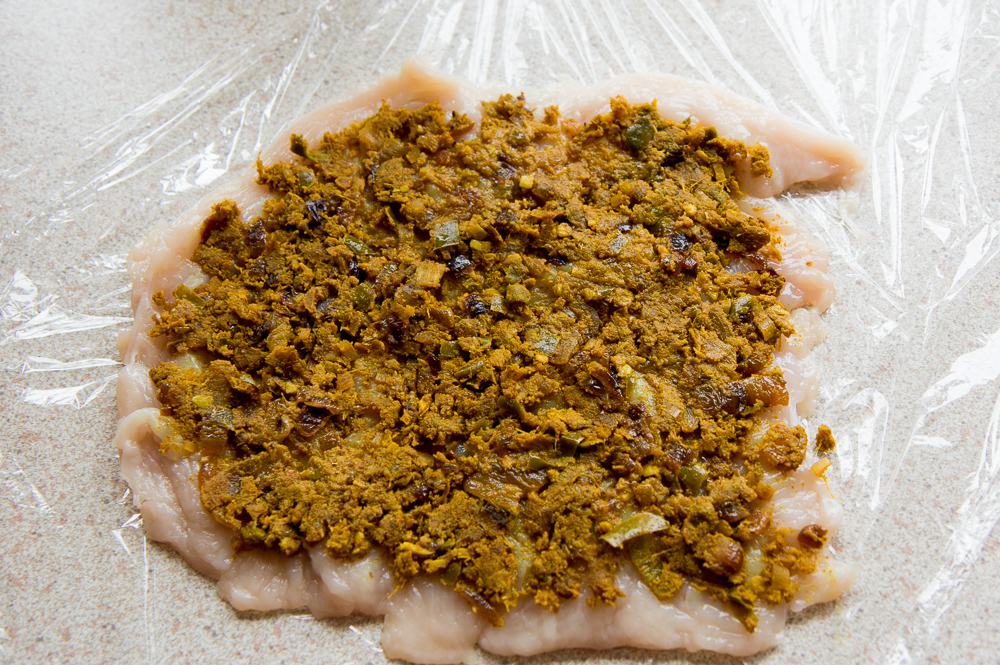
Once the chicken breast has been batted out, season with salt and black pepper. Now cover with a layer of your well chilled spicy filling. (see image)
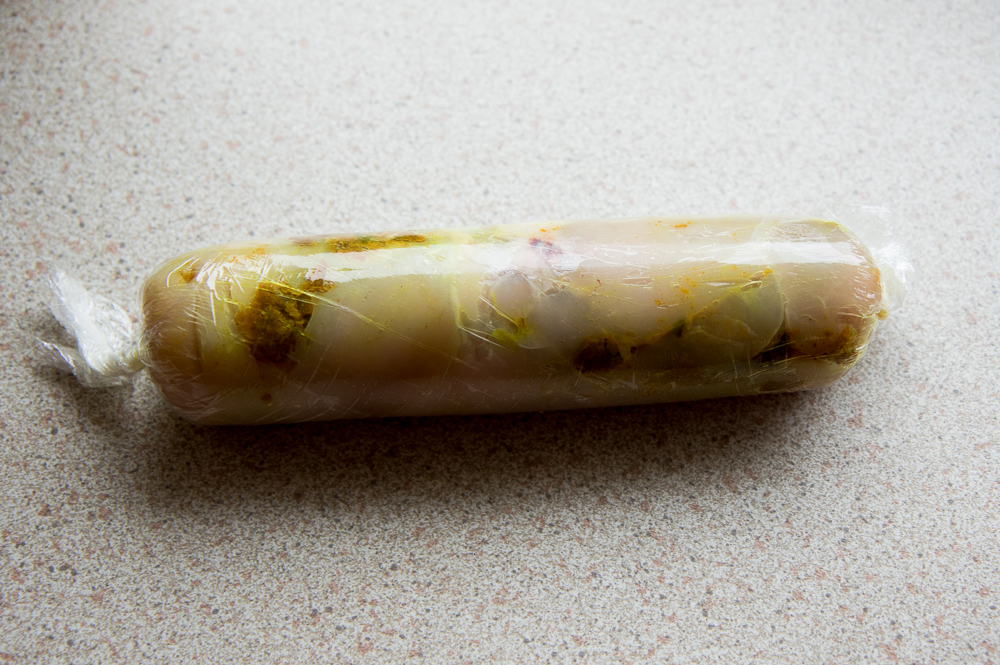
Roll up your breast meat and wrap tightly in a layer of cling film – twisting the ends. Wrap in a second layer of cling film and again twisting the ends. (see image)
The roulade can be made in advance and stored in the refrigerator.
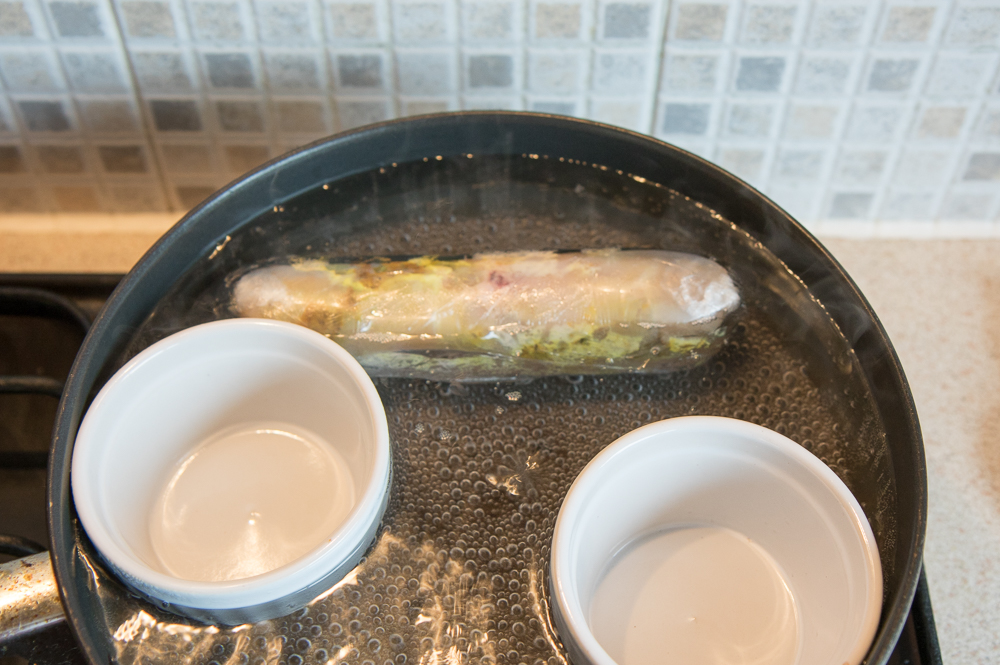
Cooking The Roulade:
Bring a pan of water to a simmer.
Place your roulade, in the cling film, in the simmering water and pop on a lid.
Simmer the roulade for 20 minutes.
I use a saute pan with a lid. (see image)
The two ramekins stop the roulade from floating about in the simmering water – less risk of the cling film coming undone.
After twenty minutes remove the roulade, still in the cling film, and place in a cold frying pan. Leave the roulade to cool for 10 minutes then remove the cling film. Juices will run out when you cut the cling film. Note: The roulade will contain juices that will run out when the cling film is removed. You want to retain them.
After removing the cling film, put the frying pan on a low heat and add the butter.
Lightly brown the roulade – being careful not to burn the butter.
Once the roulade has browned (see image) add the lemon juice and set aside to keep warm.
Serving:
Serve slices of the chicken roulade on a bed of Quinoa.
Arrange fresh slices of mango with the salad leaves – spoon over some of the mango dressing.
Garnish with wedges of lime, coriander herb and slices of fresh chillis.
Drizzle with olive oil.
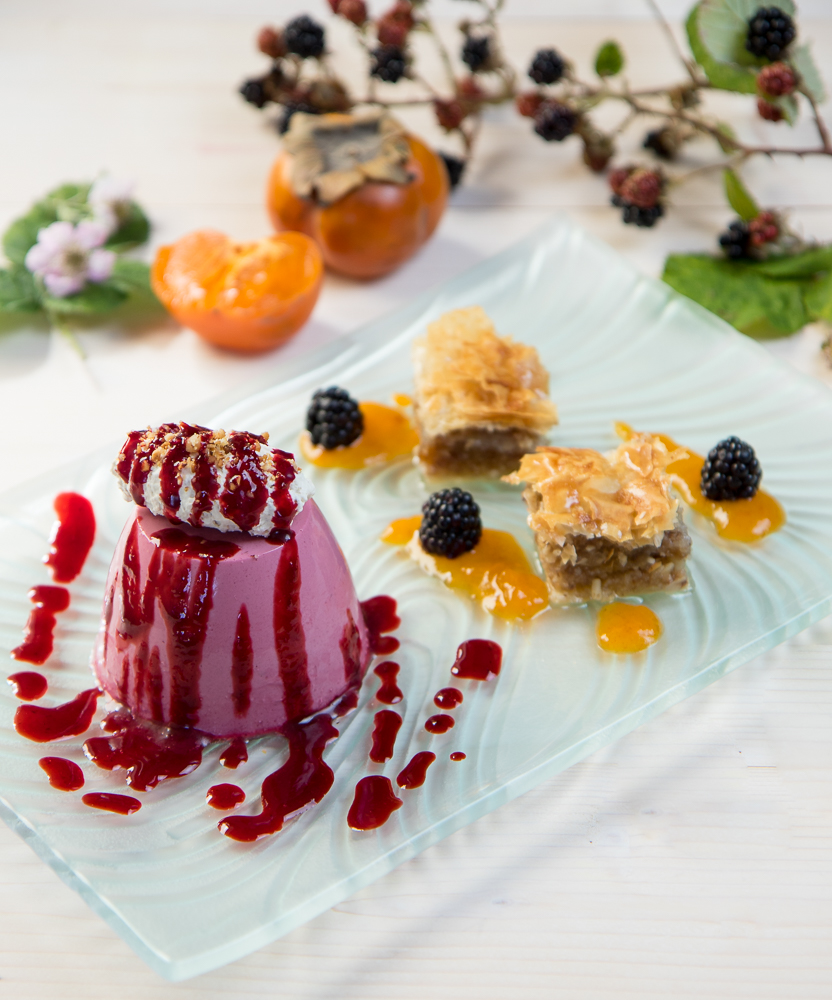
Blackberry Panna Cotta with an Apricot and Nut Baklava. Served with Whipped Cream, Sharon Fruit and a Blackberry Sauce.
British hedgerow meets Italian cream meets Ottoman delight.
Wild Blackberries are growing in abundance here in England at the moment. I don’t think I have ever seen so many fruits – it’s a bumper year – but a word of caution.
My first container was half full when an elderly lady appeared with three Great Danes…I will only pick fruits growing above chest height from now on.
After a few hours picking and culling the little black jewels, I put 500g of fruit to one side and froze the rest.
The recipe for today is a Wild Blackberry Panna Cotta with an apricot and nut Baklava. Served with whipped cream, Sharon fruit and a Blackberry sauce.
This dessert can be made in advance, chilled in the refrigerator and served when ready.
Ingredients:
Blackberry Panna Cotta: (makes 5 150ml desserts)
500ml double cream.
200ml skimmed milk.
1 tsp vanilla extract.
1/2 tsp agar agar or setting agent of your choice.
300g fresh blackberries.
70g sugar.
4 tabls water.
Blackberry Sauce:
200g fresh blackberries.
25g sugar.
Juice of 1/2 lemon.
2 tabls water.
Apricot and Nut Baklava: ( makes 20 x 25 tray bake)
15 20cm x 25cm sheets of filo pastry.
300g ground mixed nuts (100g each of walnuts, hazelnuts and almond)
180g melted butter.
150g dried apricots – pureed in a food processor.
for the Baklava syrup:
100g sugar.
210 ml water.
180g honey.
Garnish:
2 ripe Sharon fruits.
15 fresh blackberries.
125ml double or whipping cream.
10g ground and roasted mixed nuts. (optional)
Method/cook:
Blackberry Panna Cotta:
Add the blackberries, water and sugar to a pan and bring to a boil.
Once boiling, turn down the heat, add the agar agar, simmer for 4 minutes.
Next, blend the blackberry and agar agar mix then pass through a fine sieve. Set aside.
Bring the milk and double cream to just boiling. Thoroughly whisk in the blackberry and agar agar mix.
When combined, divide into five 150ml dariole moulds. Leave to set overnight.
When set, and ready to serve, loosen the at the edges then dip the moulds in hot water for 1 minute. Turn out your Panna cottas on to serving plates.
Blackberry Sauce:
Put all the ingredients into a pan.
Bring to a boil and simmer for 4 minutes.
Once simmered, pass through a sieve and set aside to cool.
Once cooled, chill in the refrigerator.
Apricot and Nut Baklava:
Set oven to gas 3 or 160°C/325°F
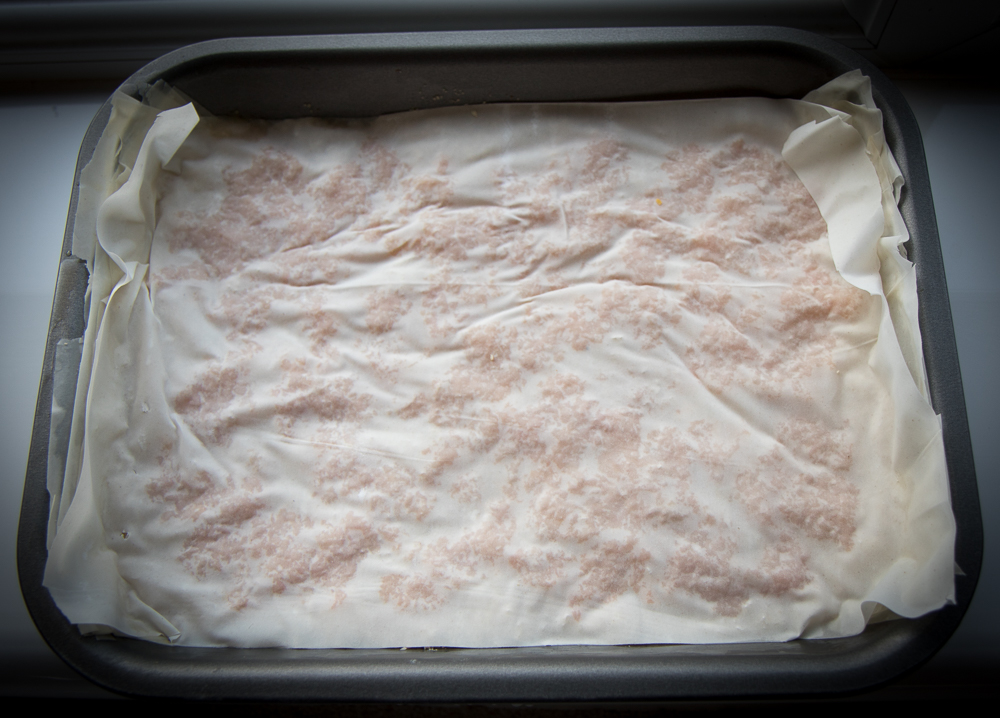
In your baking tray, place a single sheet of filo pastry and brush well with butter.
Do this with a further 4 sheets of filo – brushing each layer with plenty butter.
Now add a layer of ground nuts Approx’ 8 tabls’ and a layer of apricots. (see image)
Add a layer of filo and press down. (see image)
Now brush with butter and again add a further 4 layers of well buttered filo.
Add a further layer of nuts, followed by 5 more buttered layers of filo pastry.
Bake in the oven for 45 mins’ to 60 mins’ until golden brown.
Now make the Baklava syrup:
Place all ingredients into a pan, stir and bring to a boil. Boil for 3 minutes.
Once boiled, turn down the heat and simmer for 5 minutes. Set aside.
Once the Baklava has baked, cut into squares. Leave to cool and then pour over the warm Baklava syrup.
Leave to soak for several hours – preferably overnight.
(see image – minus a few irresistible squares)
Serving:
Turn out your Panna Cottas on to serving plates.
Add two squares of Baklava.
Spoon on ripe Sharon fruit.
Top your Panna Cotta with whipped cream and Blackberry sauce.
Garnish with fresh blackberries.
Optional: top cream with ground and roasted mixed nuts.
Fruit Tart with Liquorice Ice Cream. Served with Chocolate Cream and Blackcurrant Jelly
A melt in the mouth sweet pastry filled with a tangy fruit compote and topped with a dark chocolate cream. But it doesn’t stop there; Jelly and ice cream will take you back to your childhood…Mmm liquorice and blackcurrant.
Pastry for tart cases:
200g plain flour.
125g chilled butter.
50g caster sugar.
1 beaten egg.
Pinch of salt.
Blackcurrant Jelly:
100ml blackcurrant cordial (50% juice).
100ml summer fruit juice.
1 level tsp Agar Agar or jelling agent you prefer. Note: I prefer agar agar as it sets to a gel at room temperature and makes wonderful soft jellies.
Fruit Compote:
180g Frozen summer fruits.
3 dessert spoons sugar.
Juice of 1/2 lemon.
3 tbls of cold water.
1 heaped tsp of cornflour.
Garnish:
6 fresh strawberries
6 sprigs of mint.
Zest of 1 large orange.
Or use fresh fruits of your choice.
Method/cook:
Ice Cream:
Mix 2 dessert spoons of the sugar with the ice cream stabiliser. Set aside.
In a thick bottomed pan heat the milk, cream, milk powder, salt vanilla, liquorice powder and syrup to 82°C / 180°F. Note: Bring to a simmer if you don’t have a thermometer.
When the milk mixture has reached the required temperature, remove from the heat, and leave to cool for 3 mins’. Stir in the sugar and stabiliser mix.
With a whisk, cream together your egg yolks and remaining sugar in a heat proof bowl.
Now add your hot milk mixture to the egg yolks and sugar to create a custard – combine with a hand whisk. Note: Make sure that your milk mixture isn’t to hot as it will scramble the egg.
Pour the custard back into your thick bottomed pan, and on a low heat, stir until the custard thickens. When the mixture coats the back of a spoon remove from the heat. Note: If you have a thermometer. Heat and stir the custard to 60°C / 140°F and cook until the custard has thickened, about 5 mins’.
Strain the custard into a clean bowl and leave to cool.
Once cool refrigerate until chilled.
Once chilled, churn your custard in an ice cream maker.
Store your finished ice cream in a suitable container in the freezer. Note: You can make this ice cream without the stabiliser but it will freeze to a firmer texture.
Jelly:
Heat all the ingredients to just boiling.
Pour the hot fruit liquid into an oblong mould or dish, lined with cling film. Pop any bubbles that may form. Set aside to set. (See image)
Tart Pastry cases:
Rub the chilled butter into the flour and salt.
Combine the sugar and the beaten egg.
Make a dough by combining the the egg mix to the flour mix.
Wrap in cling film and chill until pastry is firm. Note: Initially this pastry mix is quite sticky. Have some extra flour ready to sprinkle over your hands when combining into a dough. Refrigerate the dough overnight, if you can, as it will help when it comes to rolling out.
When the dough has chilled divide into 6 equal portions and roll each piece into a circle – large enough to line 10cm tart cases.
Line six 10 cm tart cases with pastry. Bake blind for 10 minutes at gas 6 or 200°C/400°F
After 10 mins’ remove tart case from the oven. Remove parchment and baking beans and bake for a further 5 mins’ at gas 3 or 160°C/325°F.
Once baked remove from oven and leave to cool. Note: Baking blind – line uncooked pastry tarts with parchment and weight down with baking beans, dried peas or rice. This stops the bases of the tarts rising (See image)
Fruit Compote:
Except for the cornflour, in a pan, heat all the ingredients to a simmer.
Mix the cornflour with 2 tabls of water and add to the simmering fruit mixture.
When fruit mixture thickens remove from the heat and set aside to chill. Note: Don’t be tempted to add extra sugar to the compote. A slight tang or sourness is required to balance out the overall sweetness of the final dish.
Chocolate Cream:
Put all the ingredients into a pan and heat gently. As the chocolate melts whisk all the ingredients together until smooth.
Place in a clean receptacle to cool. Once cooled, place in refrigerator to firm to a piping consistency.
To serve:
Dust the edge of each tart case with icing sugar.
Half fill the tart cases with fruit compote. Top with a swirl of chocolate cream.
Turn out the jelly and cut into cubes. Arrange on the plate with slices of strawberry. Tip: Slices of strawberry will stick to the sides of the moist jelly cubes – it gives a little height and interest to the dish.
Pipe more chocolate swirls around the plate.
Place a scoop of ice cream topped with orange zest with your finished dish.
Enjoy.
Sultana Syrup:
200ml water.
3 dessert spoons of sugar.
bay leaf.
3 cloves.
slice of lemon.
slice of orange.
50g of sultanas.
Glazed Bananas:
3 small ripe bananas.
15g of icing sugar and some for dusting.
Hazelnuts optional.
Method/Cook:
Pastry:
Add flour and salt to a bowl and rub in the cold butter to a fine crumb.
Lightly hand whisk the egg and sugar together.
Add the egg and sugar mixture to the flour mix to form a dough.
If needed, add cold water, a tablespoon at a time, if the dough is a little dry.
Once the dough is made place in the refrigerator to chill – 1 hour.
Divide pastry into 6 equal portions.
Roll out each portion of pastry and line six round 9cm/3.5″ baking rings. I use non-stick egg rings with a depth of 4cm/1.5″
After lining rings with pastry ‘bake blind’ (see note) for 10 minutes at gas 6 or 400°F / 204°C. After 10 minutes remove parchment paper and baking beans and bake for a further 5 minutes.
Once tart cases are baked remove from the oven and leave to cool – do not remove the rings at this point. Note: Baking blind. Line your uncooked pastry cases with parchment paper, bottom and sides, fill each ring with baking beans or dried peas. This stops the pastry from rising at the base and falling in at the sides.
Custard filling:
Lightly hand whisk the eggs and the sugar together in a bowl.
Heat the milk and vanilla in a pan until just warm.
Pour the warm milk onto your egg and sugar mixture and hand whisk together.
Transfer the mixture to a pouring jug and pour into your cooled pastry tart cases.
Once you have filled your pastry cases with custard, grate the top of each tart with fresh nutmeg.
Place in the oven and bake for 30 minutes or until custard has set. Gas 6 or 400°F / 204°C.
When cooked, remove from the oven and set aside.
Toffee Sauce:
Place sugar in a thick bottomed pan over a low heat – do not stir as sugar will crystallize before turning to a caramel.
When the sugar melts and starts to turn a golden brown remove from the heat.
Add the cream and butter – be careful at this point as the caramel is extremely hot and will bubble up as you add the cream.
On a low heat continue to stir until all the ingredients have formed a smooth sauce. Note: On adding the cream, some of the the caramel will go hard and sticky. This caramel will melt as you stir cook the sauce out.
Once ready set aside.
Sultana Syrup:
Place all the ingredients except the sultanas in a pan.
Bring to a simmer and simmer for a further ten minutes.
Add the sultans and simmer until the liquid has reduced by half. Leave to cool.
Glazed Bananas:
Slice bananas into 5mm / 1/4″ slices and place on a non-stick baking tray lined with parchment paper.
Dust each slice with icing sugar and place under a medium grill until each slice turns a light golden brown. Or us a blowtorch if you have one.
To Serve:
Top your cooked tarts with a little of the toffee sauce and serve with the glazed bananas and sultana syrup. Dust with icing sugar.
Hazelnuts can be used to garnish for a little extra texture. Note: The toffee sauce and syrup can be served warm as can the tart – enjoy.
Rose Veal liver with rosti potatoes, glazed turnip, roasted shallots and a red wine sauce.
I do like a traditional Sunday lunch, but it can become a little samey, roast chicken, roast pork, roast beef…you get the idea. So today, with great trepidation, I have thrown tradition out of the window. This strategy is high risk and I could quite literally be following tradition through the window, followed by liver, red wine sauce and a variety of vegetables. Traditionalists, and teenagers, can be an uncompromising bunch.
Several hours later. Phew! I don’t know what all the fuss was about. The dish went down a storm. “It’s about time we had something different…we are fed up with roasts!”
If you haven’t tried Rose Veal liver then I would highly recommend it. The liver is melt in the mouth and has a sweeter less ‘livery’ flavour than liver from other animals. You may even get a compliment.
Recipe: (for 2 persons)
Veal liver:
350-400g Rose Veal Liver.
2 tbls olive oil.
25g butter.
Salt and pepper to season.
Rosti potatoes:
2 small potatoes. 170g for each potato.
3 tbls olive oil.
Salt and pepper to season
You will need two 9cm cooking rings.
Garnish:
10 Shallots.
1 small turnip/swede.
4 tbls olive oil.
30g butter.
2 tsp sugar.
300g broccoli.
Salt and pepper to season.
Red Wine Sauce:
300ml red wine.
2 tbls red wine vinegar.
1/2 of a red onion – chopped
3 mushrooms – button or chestnut – sliced.
250ml chicken stock.
25g unsalted butter.
Cook/method:
One:
Trim veal liver removing any sinew or collagen.
Set aside in the fridge for later.
Two:
Set oven to gas mark 6 or 200c/400f.
Put two small pans of water on to boil – one for turnip and one for broccoli.
Three – Roasted shallots:
Peel shallots – leave whole – and place in a oven proof dish.
Spoon over the olive oil add the butter in small pieces.
Sprinkle with the sugar and season with salt and pepper.
Place in the oven on the middle shelf.
They will take approx’ 40 minutes to soften and brown – baste the onions, every 10 minutes, as they cook.
Four – Broccoli and turnip:
While the shallots cook prepare broccoli and turnip.
Peel and slice turnip into 1/4 inch or 1/2 cm slices.
Blanch the slices of turnip for 3 minutes in boiling water.
Refresh turnip slices in cold water, drain and set aside for later.
Trim broccoli and separate the florets. Cook in boiling water for 4 minutes.
Refresh in cold water, drain and set aside for later.
Five – Rosti potato:
Peel two small potatoes and grate into a bowl. Season with salt and pepper.
Place grated potato into the center of a cloth or tea towel. Wrap up the cloth and twist over a bowl to squeeze out the moisture from the grated potato.
Discard any liquid squeezed out from the potato.
Put a large non-stick frying pan on a hob over a medium heat – add the olive oil.
Place your two 9cm cooking rings into the frying pan.
In each ring add a thin layer of grated potato and carefully brown on one side.
When one side of the potato is browned remove the cooking rings and turn each potato rosti over to cook and brown the other side. Once cooked set aside on kitchen paper.
Cook more rosti potatoes until you have used up all the grated potato. Set all your rostis aside for later.
Note: If you have a large enough frying pan and 4 cooking rings then cook four rostis at the same time.
The rostis should be thin enough that they only have one thin layer of potato – They will crisp up once cooked.
Tip: If your frying pan becomes a bit dry, add a drizzle of olive oil to each rosti as they cook.
Six:
Check your shallots. They should be turning golden brown and going soft. If they are cooked remove them from the oven and set aside.
Seven – Glazing the turnip:
Place your cooked slices of turnip onto a non-stick tray.
Brush with butter, season with salt and pepper and sprinkle with sugar.
Place under a medium grill and cook until golden brown.
Once cooked set aside for later.
Note: If you have a kitchen blow torch then use that to glaze your turnips.
Eight – Red Wine Sauce:
Melt 7g, or a heaped teaspoon, of the butter in a frying/saute pan.
Add the chopped red onion and sliced mushroom. Lightly fry until golden brown.
Add the red wine vinegar and reduce until vinegar has been absorbed.
Add the red wine and flame to burn off alcohol. Reduce by half.
Add the chicken stock and reduce by half.
Take off the heat and strain into a clean pan. Set aside for later.
Nine – Cooking the veal liver and serving:
Your shallots should be cooked so turn your oven down to gas 3 or 160c/325f
Place your rosti potatoes and turnip in the oven to warm through.
Cook the veal liver in a frying pan with the olive oil and butter.
Seal liver on both sides and fry until cooked.
When cooked, place liver in the oven to keep warm.
Heat your cooked broccoli in a pan of boiling water or microwave.
Put your red sauce on the hob on a medium heat until simmering.
Add 20g of chilled butter and stir until melted. This will slightly thicken and add a sheen to the sauce.
Season the sauce with salt and pepper.
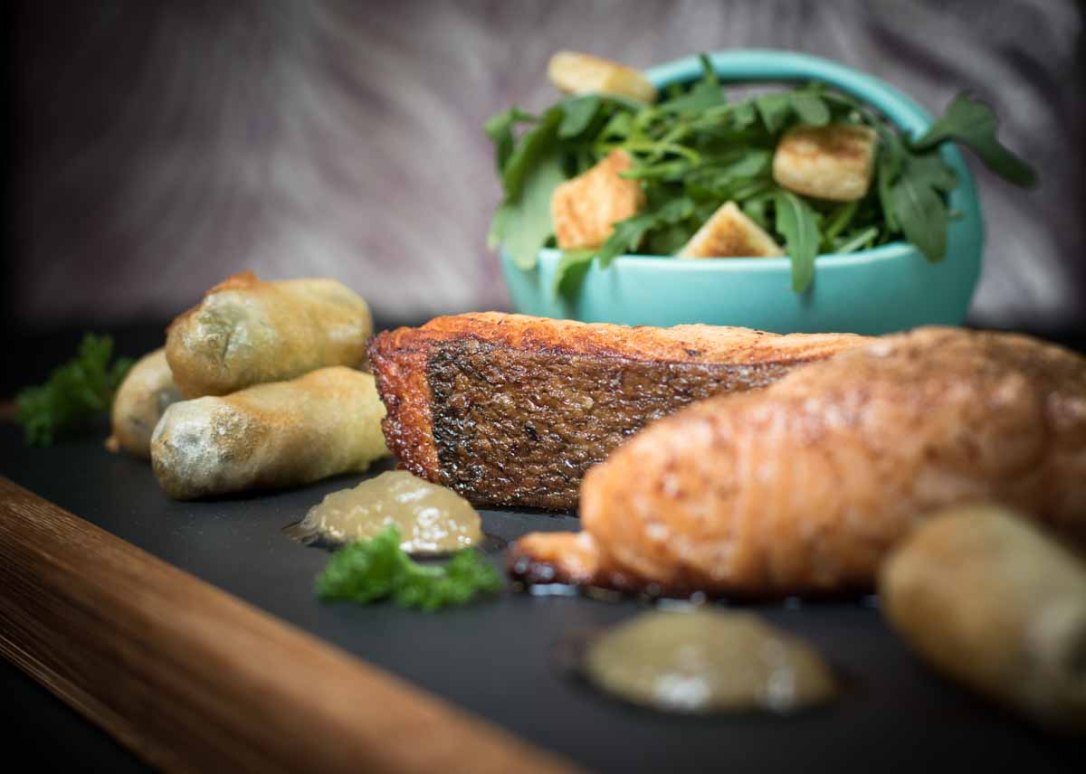
For the final dish I stacked slices of veal liver with rosti potatoes and topped with the slices of glazed turnip – see image.
Around the plate I arranged the cooked broccoli and roasted shallots then drizzled with red wine sauce.
Hope you try this dish as Rose Veal Liver is melt in the mouth gorgeous. Enjoy.
Crispy skin salmon with pickled tempura gherkins. Accompanied with an apple and cider dip, rocket salad and croutons.
Walking around the supermarket this morning and the fresh salmon fillets sent my creative juices into a tizz – 20% off – I’ll have two.
Half an hour later I was back home in the kitchen unpacking my haul.
“Whats for lunch dad?”
“Salmon…you can give me a hand if you like.”
“Just give me a shout when it’s ready. I’ll be in my room.”
So here it is, my first blogging recipe for two. Light, simple and ‘appreciated’ by teenage offspring. Made this many times since its initial creation as family and friends seem to love the crisp crunch of the croutons and gherkins with the soft flaky salmon.
Ingredients:
2 boneless cuts of Salmon fillets. Not from the tail end. Buy thicker fillets from the middle of a whole fillet.
2 tbsp olive oil.
25g unsalted butter.
salt and pepper.
1 lemon.
Apple and cider dip:
2 apples.
2 shallots.
200ml cider.
1 tbsp white wine vinegar.
knob of butter
1/2 of a lemon.
Pinch of sugar.
Salt and pepper to season.
Salad and Croutons:
1 small bag fresh rocket salad.
1 slice thick white bread – for croutons.
2 tbls olive oil.
15g unsalted butter.
Cook/method:
One – prepare salmon:
Check salmon fillets for bones – even boneless can sometimes have the odd bone.
Scrape the scales off the skin using a blunt knife.
Rinse the salmon fillets under cold water, dry on kitchen paper, store in fridge for later.
Two – salad:
Wash and dry the rocket salad. Set aside in the fridge.
Three – prepare croutons:
Cut slice of bread into approx’ 1/2 inch squares.
In a frying pan gently heat the olive oil and butter until butter has melted.
Add the squares of bread to the pan and gently cook until golden brown on both sides. Note: You can drizzle a little more oil into the pan, as the croutons cook, if you think
it needs it.
When croutons are golden brown remove from the pan, drain on kitchen paper and set aside for later.
Four – make apple and cider dip:
You will need a small pan with a lid.
Peel, core and slice apples – set aside in a bowl of water with a squeeze of lemon – this stops the apples from going brown.
Peel and chop the shallots into a small dice.
Melt the butter in a small pan and add the onions – gently cook/sweat until onions are soft. Do not brown.
When the onions are soft add the white wine vinegar and reduce on a low heat until absorbed by onions.
Now add the cider and the drained sliced apples to the onions, put a lid on the pan. Cook, for 3 minutes, on a gentle heat until the apples have softened.
Add a pinch of sugar and season with salt and pepper. Set aside for later.
Tip: If you prefer, a smoother apple dip, pass the cooked mixture through a fine sieve or blend with a hand blender.
Five – Tempura Gherkins:
Have your fryer ready on a medium heat.
Dry your pickled gherkins on kitchen paper and lightly coat with flour – this will help the batter to stick.
Add flour, salt and sugar to a bowl then whisk in the tonic water. Your batter is made.
When ready dip Gherkins into the batter and drop, carefully, into fryer. Cook until batter is golden brown. Keep warm.
Tip: Use bamboo skewers to stab the gherkins – dip the gherkins, on the end of the skewers, into the batter. Still on the skewers dip the gherkins into the hot frying oil for 10 seconds – twist the skewer off the gherkin and fry gherkin until golden brown.
Note 1: If you want a thicker batter add more flour, a dessert spoon at a time, until you have the consistency you want.
For a thinner batter add more tonic water, little by little, until it reaches the consistency you prefer.
Note 2: You can batter and deep fry your gherkins before cooking your Salmon, but I prefer to cook them last as they remain crispy when served.
Six – Cooking the salmon:
You will need a non-stick frying pan.
Now that the prep’ (mise en place) is done, it’s time to cook the salmon.
Season the Salmon fillets with salt and pepper.
In a, non-stick, frying pan add the olive oil and heat. Not too hot.
Skin side down add the salmon fillets to the frying pan. Hold each fillet down, for 10 seconds, as you place them in the pan – stops fillets from curling.
Slowly fry on the skin for 3 minutes. Then turn each fillet onto it’s side to seal the sides. Just 15 seconds on each side.
When the salmon sides are sealed turn salmon back onto its skin and add the butter.
Over a medium heat, continue to cook the salmon, for 3-4 minutes, while basting with the butter. Finish with a squeeze of lemon.
Keep warm.
Seven: Enjoy
Serve your salmon fillets with washed rocket salad, croutons, apple and cider dip and tempura gherkins. Wedge of lemon optional.